Monday, 23 September 2013

Moist Carrot Cupcake with Cream Cheese Frosting


Carrot cake is one of the easiest recipe around. It is also a personal favorite because of the moist texture and not forgetting the walnuts. So I made some carrot cupcakes for a gathering with some friends last Saturday and feedbacks from them are good. And that makes me happy. Carrot cakes is a really easy cake to make. You should try it. Just mix the wet and dry ingredients. That's it!


So far I have been using cream cheese frosting for my cupcakes because they don't taste too sweet and I do not like the buttery flavors from buttercream frosting.

So, here's the recipe.


Ingredients

1 1/3 cups all-purpose flour or plain flour
1 tsp baking soda
1/4 tsp salt
1 tsp ground cinnamon
1/2 cup walnuts, chopped
2 eggs
2/3 cups granulated white sugar
2/3 cup canola oil (or vegetable, sunflower. corn oil)
1/2 tsp vanilla extract
2/3 cup unsweetened applesauce (or grated apple / crushed pineapple)
1 1/3 cups finely grated raw carrots


Directions

Preheat oven to 180 Degree C.

In a large bowl, whisk together the flour, baking soda, salt and ground cinnamon.. Fold in the chopped walnuts. I will usually prepare the dry ingredients beforehand where I just mixed them together and store in a container. As for the walnuts, I usually prefer to roast them for a few minutes.

In another large bowl, whisk the eggs until lightly beaten. Then whisk in the sugar, oil and vanilla extract until slightly thickened. Fold in the applesauce and grated carrots. 

Fold this mixture into the flour mixture until incorporated. Evenly fill the baking cups with the batter.

Bake for about 20-23mins or until a toothpick comes out clean,

Remove from the oven and place on a wire rack and let cool completely before frosting.

For the frosting, I always used the cream cheese frosting recipe from Glorious Treats


Sunday, 25 August 2013

Strawberry Shortcake!

Strawberry shortcake is one of my favourite because of the light texture. The cream is light and not buttery. The sponge cake soft and fluffy. And the strawberries gave a sweet and sour sensation. This cake is well liked by most people.  In one bite, you can experience the cool and lightness of the cream, the soft and fluffy cake and the sweet and sour strawberries, with a hint of rum. It just taste heavenly!


Ingredients:

Sponge Cake

2 eggs (Room temperature)
60g granulated sugar
60g cake flour
20g melted unsalted butter

Syrup

20ml hot water
1/2 tbsp granulated sugar
11 tsp rum

Decorations

Fresh strawberries
300ml whipping cream
1 1/2 tbsp granulated sugar
A few drops vanilla extract
1 tbsp rum


Directions

Sponge cake

Line the side of the  round cake pan with parchment paper. Preheat oven to 170 Degree Celcius (338F)

Beat the eggs with whisk in a bowl. Mix sugar and place it over a bowl of hot water and melt the sugar and warm them up to body temperature. Remove from the hot water and beat the batter on high speed with an electric mixer until white and fluffy. Then beat on low speed for about a minute to set the texture.

Sift in the cake flour and gently mix the batter with a whisk. Sprinkle the melted butter and gently mix the batter

Pour the batter into a 7 inch pan and drop the pan lightly on the counter to raise the air bubbles out of the batter.

Bake at 170 Deg C for 25 minutes.

Place a cutting board and a paper towel on a wire rack. Purpose of the paper towel is so that the cake doesn't stick. Then place the cake pan upside down and cool with the pan on top

When it is completely cool, wrap with plastic cling wrap and refrigerate for 1 or 2 hours. You may also keep them in the fridge for about 2 to 3 days and decorate when needed.

Syrup

Mix granulated sugar and hot water until dissolved. Then mix in the rum.


Decoration

Combine whipping cream, sugar, vanilla extract and rum in a dry clean bowl. Ensure that your whipping cream is chilled so that it will be easier to whip. Alternatively, you can place your bowl in ice water. Whisk until it forms a soft peak.

Slice the sponge cake into 2 layers. Gently brush the sponge cake with syrup. Brush all the surface which will be coated with the cream.

Place one layer of the sponge cake on a plate. Coat the surface evenly with cream. Place cut strawberries over the creamed surface. Then coat again with cream. Place another layer of sponge cake and frost the top and side with the cream. Garnish with more strawberries!

Refrigerate the cake for about 1or 2 hours before serving. This will enable you to cut the cake more easily.

Now, enjoy!


Monday, 12 August 2013

Japanese Cheesecake

This is a very light, moist and fluffy cake with a sort of cotton-y texture. If there is such a word to describe. Every bite of the cake will simply melt in your mouth. It's a totally different type of texture from the usual creamy cheesecakes that we usually had.

This is my second attempt and it was a success! My first attempt failed because the cake collapsed. That is because I didn't use parchment paper to line the side of the cake tin. Its always a joy to me to bake a successful recipe.


Ingredients (Recipe from The Little Teochew)

140g fine granulated sugar
6 egg whites
6 egg yolks
1/4 tsp cream of tar tar
50g butter
250g cream cheese
100ml fresh milk
60g cake flour (can also use plain flour)
20g corn flour
1/4 tsp salt


Directions

1. Preheat oven at 160 Degree Celcius

2. Melt cream cheese, butter and milk over a double boiler

3. Cool the mixture. Fold in the flour, corn flour, salt and egg yolks and mix well.

4. Whisk egg whites with cream of tar tar until foamy. Add in the sugar and whisk till soft peaks form.

5. Add egg whites to the cream cheese mixture and fold well.

6. Pour into a 8 inch round springform cake pan or removable-bottom cake pan. Before pouring the mixture, be sure to lightly grease and line the sides of the pan with greaseproof baking paper or parchment paper. This is important! Because the first time I baked without lining with parchment paper, the whole cake collapse!

You may also want to line the bottom of the pan with aluminium foil or parchment paper. I do this because its easier to remove the cake from the pan.

7. Bake the cheesecake in a water bath for 1 hr 10 mins or until set and golden brown.

8. Leave to cool in the oven with door ajar for about 30 mins to 1 hr. This is just so that the cake doesnt come into contact with cold air too quickly and ends up collapsing.


Sunday, 7 July 2013

Hokkaido Chiffon Cupcake


This is actually my third attempt on making this and this time round it was a success. The first two times, the cake comes out a little bit too hard. It is always challenging when it comes to meringue recipes. It takes practice though. Once you get the hang of it, it is actually very easy. The mixing of the batter plays a part too. So when you are doing the mixing, always remember to fold or whisk them lightly.

Egg Yolk Batter Ingredients
- 6 egg yolks
- 40 g sugar
- 80 ml Canola oil
- 80 ml milk
- 120g cake flour

Meringue Ingredients
- 6 egg whites
- 80 g sugar

Whipped Cream
- 3 cups of whipping cream
- 3/4 tsp vanilla extract
- 1/2 cup sugar


For egg yolk batter
1. Beat the egg yolks and sugar till it becomes pale and like mayonnise.
2. Add canola oil and milk. Add sifted cake flour and mix well with whisk.

For the meringue
1. Whipped the egg whites and sugar. Whisk till stiff peak.

Combine both mixture. Add 1/3 Meringue into the Egg Yolk Batter and blend well with a whisk. Then add the rest of the Meringue 1/2 at a time and mix well.

Preheat the oven to 170C (338F).

Spoon the mixture into the cups about 3/4 full. Before popping them into the oven, remember to give a few taps on the table to let out the air bubbles from the batter.

Bake for 20-25mins, depending on your oven.

Whipped cream
Measure the whipping cream, sugar and vanilla into the mixing bowl, mix on high speed until medium peak form. Fit the piping bag with a narrow tip, and fill it with whipped cream. Pipe the cream into center of the cupcakes after they are completely cooled or refregerated. Dust with powdered sugar.


Look at the cream oozing out! Its yummy and heavenly! I think it is best to eat when its cool and chilled because the whipped cream will give a refreshing texture. This is a very light dessert because its not too sweet and is soft, moist and fluffy.

Sunday, 23 June 2013

I love colours!


This is taken quite some time back when me and Thomas went to Gardens by the Bay. I love daisies alot and I think it looks good with yellow. :D Hope my week ahead will be as bright as the flowers!

Monday, 3 June 2013

Pre-Wedding photoshoot prep 1 - Painted Alphabets


This Friday is our pre-wedding photoshoot and I just started working on preoaring tge props last week?
So I bought some white wooden alphabets from Typo and painted our colour theme. Orange and grey. Looks pretty nice actually,  love the colour.

I am left with just a few more days so hope I am able to finish preparing!

Saturday, 11 May 2013

Chocolate muffin


One reason that I like to make muffin is that it is very easy. Just mix everything together and tadaa! Muffins with a glass of milk makes a very good breakfast. You can store them in containers and before you want to eat it, just pop it into the microwave and warm it up a little and it will taste like you just baked them.

So I am craving for something chocolate-y recently... :D


Ingredients

2 eggs
1 cup sugar
1 cup all-purpose flour
6 tbsp unsweetened cocoa powder
2 tsp baking powder
A pinch of salt
1 tsp vanilla essence
2/3 cup milk
2/3 cup unsalted butter (Melted)
Semi sweet chocolate chips (Optional)*


Directions

Preheat oven to 180 Degree C.

Beat the eggs with sugar. Mixed in the flour, cocoa powder, baking powder, salt, vanilla and milk.
Add in the butter. For me I like to use either whisk or a spatular to mix the ingredients. This can prevent over mixing which will make you muffins comes out too tough.

*Optional : You can add in some chocolate chips if you want, depending on your preference.

Pour mixture into muffin cups, about 2/3 full. Bake for about 20 - 25 mins. Depending on the size of you muffin cups. Mine is about the medium size cups. If you are using bigger ones, you may increase the baking to time to about 30 mins.


For me, I like to eat my chocolate muffins with vanilla ice cream. I think they are really a perfect match. Can't go wrong with it. :)

Monday, 29 April 2013

Pandan Chiffon Cake

This is my fourth attempt in trying to make this cake and I finally succeed for the first time! I was so happy that I finally made it.

I have always loved pandan cake because of the nice fragrance from the pandan leaves, plus the light and fluffy texture of the cake. Simply delicious.

Isn't this a very nice green colour?


 Ingredients 1

7 eggs Yolks
75g fresh coconut milk
Pandan extract (I use about 30 pandan leaves)
150g cake flour
4g baking powder (1 scant tsp)
95g sugar
3g salt
83g canola oil

Ingredients 2

7 egg whites
100g sugar


Directions

1. Preheat oven to 160 Deg C.

2. Beat egg yolks and sugar till it becomes pale, thick and creamy or mayonise-like.

3. Add coconut milk and pandan extract*. Add canola oil. Whisk till evenly mixed.

4.Sift in cake flour, salt and baking powder and gently whisk the mixture till evenly mixed. Put aside.

5. Add sugar to egg whites and beat till stiff peak.

6. Add the egg whites mixture to the egg yolks mixture in 3 batches and gently mixed.

7. Pour mixture to a 2 piece chiffon tin. Make sure the tin is not non-stick. This recipe is too much for a 21 inch pan, so if you have a bigger pan, you may want to use it. For me, I still have some leftovers after pouring to the pan, and I bake the remaining in cupcake cups instead.

8. Bake for about 45 mins

9. After the cake is removed from the oven, flip the tin upside down and let it cool. When the cake is cooled, you may loosen the cake by sliding the knife along the side.


 * For the pandan extract, I used 30 leaves and cut them into pieces. Blend them with 1/2 cup water and squeeze out the juices. Try to use younger leaves which are soft and moist, and they give better fragrance too. Older leaves tends to be dryer, so you may not get as much juices. If you can get pandan leaves anywhere, you can always find those artificial flavoring from your baking suppliers stores.


Tada! When the cake came out like that, I can't help it but smile immediately. :) Love it. Looks pretty isn't it?


Monday, 8 April 2013

Beef burger with cheese and portobello mushroom


Made some beef burger quite some time back. It was my first time making my own beef patties and quite surprisingly, it was very easy to make! Everyone loves it.. Adults.. Children... It was definitely a hit. :D It is also great for parties as well.


Ingredient for beef patty

1 small onion
500g mince beef
1 egg
1 tbsp vegetable oil / olive oil
4 burger buns
All or any of the following - Tomato slice, beetroot, horseradish sauce, mayonnaise, ketchup, lettuce, rockets, watercress


Method


Chop onions into small diced pieces. Tip the beef into a bowl with the onion and egg, then mix. The guide for eggs is about 1 egg to per pound of beef so that the patties will not crumble.

Divide the mixture into four. Lightly wet your hands. Carefully roll the mixture into balls, each about the size of a tennis ball. Set in the palm of your hand and gently squeeze down to flatten into patties about 3cm thick. Make sure all the burgers are the same thickness so that they will cook evenly. Put on a plate, cover with cling film and leave in the fridge to firm up for at least 30 mins.  

Heat the pan to medium hot. Lightly brush 1 side of each burger with oil. Place the burgers, oil-side down, on the pan. Cook for 5 mins until the meat is lightly charred. Don't move them around or they may stick. Oil the other side, then turn over using tongs. Don't press down on the meat, as that will squeeze out the juices. Cook for 5 mins more for medium. If you like your burgers pink in the middle, cook 1 min less each side. For well done, cook 1 min more.

Take the burgers off the pan. Leave to rest on a plate so that all the juices can settle inside.

Slice each bun in half. You may pop your buns into the microwave or a minute or two for a sligthly crsipy bun.

Depending on your preference, I like my beef burger with cheese and sauteed portobello mushroom. Totally in heaven!

Enjoy!!

Monday, 18 February 2013

Buttermilk Chocolate cupcake with Oreo Creamcheese frosting

So last week is the Valentine's Day and we decided to just have a simple picnic under the stars at Marina Barage. Well, not really stars because it rained before that. But it was a nice cooling evening.

We celebrated the day after and I prepared for him a full dinner. Haha. I made salad, beef burger, and cupcakes and all of them is a success! I am proud of myself. :D


Ingredients

1/2 cup butter, softened
1 1/2 cups sugar
2 eggs
1 tsp vanilla extract
1 1/2 cups all-purpose flour
1/2 cup baking cocoa
1 tsp baking soda
1/4 tsp salt
1/2 cup buttermilk
1/2 cup water
 

Method

1. In a large bowl, cream butter and sugar until light and fluffy
2. Add eggs, one at a time, beating well after each addition
3. Beat in Vanilla
4. Combine the flour, cocoa, baking soda, and salt
5. Combine buttermilk and water
6. Add dry ingredients to creamed mixture alternately with butter and water
7. Fill paper-lined muffin cups two-thirds full
8. Bake at 190 Deg C.


Sunday, 17 February 2013

CNY Almond Biscuit


Last year, my aunt baked this and I love it a lot. So, I decided to try making this year and it turned out great!

Ingredients

600g Sugar
230g Icing Sugar
375ml Canola Oil
1 Egg
1 tsp Salt
2 tsp Baking Powder
1/4 tsp Baking Soda
100g Almond Chips

Method

1.Pre-heat oven at 180 Dec C.

2. Sieve flour, baking powder, baking soda, icing sugar and mix well.

3. Add the almond chips, salt, and oil and mix well.

4. Lay the baking tray with parchment paper. Roll the dough into balls and line them on the baking tray. If the dough is too wet, add more flour, if too dry, add more oil.

5. Beat the egg slightly and brush over the top of the rolled dough before baking.

6. Bake for about 9mins or until the top turned slightly golden brown.


Long overdue post : CNY Cornflakes cookies

This is actually a long overdue post. But hey, its still Chinese New Year! This is really a very easy recipe, which is great if you are making a few different cookies for Chinese New Year. I always go for those quick and easy recipes. My beloved Fiance loves it alot and he told me that it taste really nice and crunchy.


Ingredients:

  • 250g butter
  • 165g caster sugar
  • 1 egg
  • 65g crushed cornflakes
  • 3/4 tsp vanilla essence
  • 310g plain flour
  • 1tbsp baking powder
  • A pinch of salt
  • 180-200g lightly crushed cornflakes for coating

Method:
1.    Cream the butter and sugar till light and fluffy
2.    Add in the eggs, vanilla, mix well.
3.    Fold in sifted flour, baking powder and salt and then add in crushed cornflakes.
4.    Scoop the batter into small baking cups
5.    Bake in a preheated oven at 180*C  for about 20-22 mins., or till light golden brown.
6.    Let them cool on the  baking tray for about 30 mins  before storing in air-tight container.
7.    Makes 80-90 cookies.


Very easy right? But do note on the baking time as underbaked dough will result in chewy cornflakes instead of crunchy.


Saturday, 16 February 2013

7th Day of Chinese New Year


Today is the 7th day of the Lunar New year, which is also 人日, common man's birthday. This is the day when everyone grows one year older.

Happy Birthday everybody!

Friday, 28 December 2012

Blueberry crumble muffins

Muffins are one of my favourite bakes because they are just so easy to make. I was at the supermarket the other day and saw the blueberries and I just had to buy them. These muffins really still stays yummy after storing for a few days. It is best if you can just pop into the microwave an warm it up a bit and it still taste great!


Recipe from Bake or Break

Ingredients

For the crumb

3/4 cup all-purpose flour
2 tablespoons light brown sugar
2 tablespoons granulated sugar
4 tablespoons unsalted butter, melted
1/4 teaspoon vanilla extract
pinch of salt

For the muffin

2 & 1/4 cups all-purpose flour
2 teaspoons baking powder
1 teaspoon baking soda
pinch of salt
2 large eggs
1/2 cup buttermilk
1/2 cup firmly packed light brown sugar
1/2 cup granulated sugar
1 teaspoon vanilla extract
1/2 teaspoon lemon zest (optional)
1/2 cup unsalted butter, melted (I substituted with canola oil)
3/4 to 1 cup blueberries (I used fresh blueberries)


Directions


Preheat oven to 400°(200 Deg C).

Using a fork, mix all crumb ingredients together until well-combined. Set aside. 

Whisk together flour, baking powder, baking soda, and salt in a medium-sized bowl. Set aside. 

In a large bowl, lightly beat eggs. Stir in buttermilk. Add both sugars and mix until combined. Stir in vanilla and lemon zest. Stir in canola oil. 

Add flour mixture in 2-3 portions. Mix until there are still streaks of flour remaining. Stir in blueberries, mixing just until combined. 

Scoop the batter into each cup about 2/3 full. This should fill each cup almost to the top. Sprinkle tops of each muffin with crumb mixture. 

Bake for 14-16 minutes, or until a pick inserted into the center comes out with moist crumbs. Cool in pan on wire rack.

Note : For crisper edges, grease a standard muffin pan. For softer edges, use liners in each cup instead. 

You can add more blueberries if you like. 


Pretty isn't it? 

Have a great weekend ahead everyone!
 

Wednesday, 26 December 2012

Vanilla cupcake with chocolate cream cheese frosting

I posted an entry of the red velvet cupcakes that I made recently and they all look so cute and adorable. So now I am quite into cupcakes.

And this time, I made vanilla cupcakes with Chocolate creamcheese frosting for a Christmas lunch gathering at my friend's place.

It was a great Christmas day celebration with great company and good food.


Merry Merry Christmas!!


For the cupcake

Ingredients

1 1/4 cups cake flour
1 1/4 teaspoons baking powder
1/2 teaspoon baking soda
1/2 teaspoon salt
2 eggs
3/4 cup sugar
1 1/2 teaspoons pure vanilla extract
1/2 cup oil (vegetable, canola or extra light olive oil)
1/2 cup buttermilk *

* If you can't find buttermilk, you can also use the following substitute
- 1/2 cup milk plus 1/2 teaspoon white vinegar or lemon juice - set aside for 5 minutes before using
- 1/2 cup yogurt

Directions

* Preheat oven to 350*F (180 Deg C)

* In a medium bowl, add cake flour, baking powder, baking soda and salt.  Stir together with whisk, and set aside.

* In the bowl of an electric mixer, add eggs and beat 10-20 seconds.  Add sugar and continue to beat on medium speed about 30 seconds.  Add vanilla and oil, beat.

* Reduce mixer speed to low and slowly add about half of the flour mixture.  Add half of the milk, then the rest of the flour and the rest of the milk.  Beat until just combined.  Scrap down the side of the bowl.

* The batter will be thin.   Pour batter into a muffin pan prepared with paper liners.  Fill liners about 2/3 full.

* Bake cupcakes in pre-heated oven for 12-14 minutes.

* Cool in pan 1-2 minutes, then remove cupcakes from pan (carefully) and finish cooling on a wire rack.

* Frost as desired when fully cool.


For the frosting

Ingredients

½ cup (1 stick/8 Tablespoons) butter (set at room temp about 10 minutes, but should still be cool)
8 oz. cream cheese (directly from fridge)
1/2 cup unsweetened cocoa
1 teaspoon vanilla extract (always use pure vanilla extract if possible)
4 cups powdered confectioners sugar
1 to 4 Tablespoons heavy cream, heavy whipping cream

Direction

* Place butter in a large mixing bowl and blend slightly. Add cream cheese and blend until combined, about 30 seconds.

* Add cocoa powder and blend until combined.

* Add vanilla extract and powdered sugar and blend on low speed until combined. Increase to medium speed and beat until it begins to get fluffy.

* Slowly add the heavy cream, a little bit at a time until desired consistency is met. (Don’t add too much if you want the frosting to stay in place when piped on cupcakes.)

* Beat until fluffy, about 1 minute.

*Use at once or keep refrigerated. (This frosting will keep well in the refrigerator for several days, but you may need to re-beat it for the best texture.)

Happy Holidays everyone!

Monday, 10 December 2012

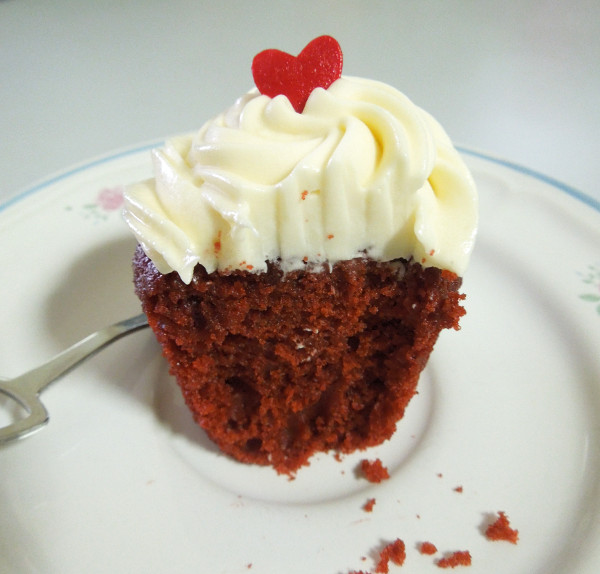
Red velvet cupcake with cream cheese frosting

I have always been wanting to try to make a red velvet cake but didn't really go about looking for a recipe from the internet. And recently I found a recipe from Glorious Treats and decided to give it a try because the pictures is just too adorable. This cake is good for occasions like Valentine's Day or Christmas because of the colour.


For the cupcake


Ingredients

2 1/4 cups cake flour
1/3 cup unsweetened cocoa (Dutch process)
1  tsp salt
1 1/3 cups oil (Canola oil or any cooking oil)
1 1/2 cups sugar
2 eggs
4 tbsp liquid red food coloring (or 1 tablespoons concentrated food coloring)
1 tsp vanilla
3/4 cup buttermilk
1 1/2 tsp baking soda
2 tsp white vinegar

Directions

1. Preheat oven to 350*F (180 Deg C).  

2. In a large bowl whisk cake flour, cocoa and salt, and set aside.

3. Whisk or beat oil and sugar until well blended. Add eggs one at a time, and continue beating.  

4. Add food coloring and vanilla and mix well.

5.  Add flour and buttermilk alternately, in two batches. Mix just enough to combine. 

*I am not able to get any buttermilk from the Cold Storage near my house, so I used yogurt as substitute which I just so happens to have a tub which I bought to go with my cereals. To use yogurt, it will be 1-to-1 ratio, which means 1 cup of buttermilk equals to 1 cup yogurt. There are other substitutes if you do not have yogurt. You can also use 1 cup of milk plus 1 tbsp of vinegar or lemon juice.

6.  Place baking soda in a bowl or cup, add vinegar and stir (it will foam and expand).  Add to cake batter and beat for 10 seconds.

7. Fill cupcake liners 2/3-3/4 full. Bake cupcakes 20-24 minutes.

For the cream cheese frosting


Ingredients

½ cup (1 stick/8 Tablespoons) butter (set at room temp about 10 minutes, but should still be cool)
8 oz. cream cheese (directly from fridge)
1 tsp vanilla extract
2 cups powdered confectioners sugar
1 to 2 tbsp heavy cream, heavy whipping cream

Directions

1.  Place butter in a large mixing bowl and beat until smooth. Add cream cheese and blend until fully combined

2.  Add vanilla extract and powdered sugar while mixing.  Increase to medium speed and beat until it begins to get fluffy. For the powdered sugar, though I it says 2 cups, it really depends on personal preference. I do not like my frosting to be too sweet, so actually I have only used less than 2 cups of powdered sugar.

3.  Slowly add the heavy cream, add abit at a time until desired consistency is met. (Don’t add too much if you want the frosting to stay in place when piped on cupcakes.) Beat until fluffy and you can start frosting your cupcakes!

They looks cute right :D Looking at them makes me smile!

 
 My cake looks darker then the usual bright red velvet cake. This is because this recipe used a slightly more amount for cocoa powder. If you want, you can reduce the amount of cocoa powder so it doesn't look more like maroon colour.

Monday, 3 December 2012

Chewy Chocolate Chip Cookies

I have looking around for a good recipe for chewy chocolate chips cookies and I think I have found the one! I have always preferred my cookies to have the soft and chewy texture as compared to those cakey ones and I have tried a few recipes and it just turns out too cakey. The previous recipe I tried before all calls for light brown sugar. But this recipe is using dark brown sugar, which makes the cookies moist. Can you see the moisture in the cookies? And the melted chocolate chips oozing out. Heavenly.


Ingredients

2 3/4 cup flour
1 tsp salt
1 tsp baking soda
1 tsp baking powder
2 1/2 stick butter
1 3/4 cup Dark brown sugar
1/4 cup granulated sugar
2 Eggs
2 tsp vanilla extract
2 cup chocolate chips

Instructions
 
1. Mix the flour, salt, baking soda and baking powder. Set aside.
 
2. Cream butter and sugars on medium speed until fluffy. Beat in the eggs one at a time then add vanilla. Reduce the mixer speed to low and mix in the flour mixture until combined. Stir in the chocolate chips by hand.
 
3. Cover with plastic wrap and set in the fridge for at least an hour, but overnight is best.
 
 
4. Preheat oven to 375 deg F (190 Deg C) and line cookie sheets with a baking mat. I used a ice cream scoop to measure out the batter and left them as balls.
 
They indeed looked like ice creams!
 
 
5. Bake for 10 - 14 minutes depending on your oven until the edges are golden and the middles are still soft. 
 
6. Let cookies cool on the cookie sheet for 8 minutes and then transfer to a cooling rack.

Enjoy!

Sunday, 25 November 2012

A staycation surprise at Marina Bay Sands

I booked a room for a 2D1N stay at MBS for my Fiance's birthday. Overall, it was a very nice and relaxing experience. Both of us really enjoyed ourselves.

It was a surprise for him, so he didn't know about all these things at all.

 Baked a Chocolate buttermilk cake for his birthday.

The room is pretty spacious. Our room is with the Garden View. Their in-room mini bar will automatically be charged once you remove any items out from the fridge. I bought a bottle of Mascato with me and I needed the fridge. So I called the operator and in the end, they delivered an additional portable cooler to my room. :D


My favorite is the bathroom. It was so spacious! They have the bathtub and a separate walk-in shower. Love it to the max!

And finally he came at night! Whole day of preparation just for my love!

Happy Birthday! 
As it was quite late already and tired to go out for dinner, we ordered room service instead. So we went ahead with the cake first! Too hungry already... Haha!

We didn't order alot of food. And we did the right thing because the portion was big. We went up to the Skypark after our dinner to have a walk. Very windy and it was about to rain, So we didn't stay too long as well.

The view when we wake up in the morning.

We went for a morning walk at Gardens by the Bay before we go back to the hotel to prepare for check-out. 

Doing what he does best. Trying to be funny all the time.


It was nice to have a short staycation once in a while. Really feels so relax and recharged!

Chocolate Buttermilk Cake

I woke up early in the morning to bake a birthday cake for my Fiance. However, this time round my cake turned out with big cracks. I think my oven was too hot. I got to say, the looks of the cake doesn't do the cake justice because even thought the cake looks ugly, it was still indeed a very yummy cake.

This is by far the best chocolate cake recipe I ever tried. The cake was very moist and the taste of chocolate is very rich. And because chopped chocolates was added to the batter, you can taste the melted chocolate from every bite. Yummylicious~


Recipe

Got this recipe from The Little Teochew. Here & here.

1 cup (4oz/114g) cake flour (plain flour is fine too)
1/2 cup (1.6oz/46g) Dutch-processed (alkalized) cocoa powder
1 tsp baking powder
1/4 tsp salt
3/4 cup (1 1/2 sticks/6oz/170g) unsalted butter, softened
1 1/4 cups (8.8oz/250g) granulated sugar
2 large eggs
3/4 cup (180ml) buttermilk*
2 tablespoons (30ml) Kahlua or substitute with 1 tbsp on rum (optional)**
1 tsp vanilla extract
4 ounces (113g) finely chopped bittersweet chocolate
or 3/4 cup miniature semisweet chocolate morsels bittersweet

* If you do not have buttermilk, pour 180ml of whole milk in a cup, squeeze in the juice of half a lemon, stir and let it sit for 5mins. You can alternatively use about 1 tbsp of white vinegar in place of lemon juice.


** I didn't use any Kahlua or rum and it still taste fine.

1. Position a rack in the center of the oven and preheat the oven to 175°C (350°F). Generously grease the interior of a 6-cake Bundt-lette pan (it's best to use shortening here). Dust the molds with flour and tap out the excess.

*Because I do not have a 6-cake Bundt-lette pan, I used a 7 inch cake pan instead.

2. In a medium bowl, sift together the flour, cocoa powder, baking powder, and salt. Whisk to combine and set aside.

3. In the bowl of an electric mixer, using the paddle attachment, beat the butter at medium speed for 2 minutes, until very creamy. Gradually beat in the sugar. Increase the speed to medium-high and beat for 3 minutes, until the mixture is well blended and light. At medium speed, beat in the eggs one at a time, mixing well after each addition and scraping down the sides of the bowl as necessary.

4. In a small bowl, stir together the buttermilk, Kahlua (or rum), and vanilla extract. If your mixer has a splatter shield attachment, attach it now. At low speed, add the dry ingredients to the butter mixture in three additions, alternating it with the buttermilk cream mixture in two additions, and mixing just until blended. Remove the bowl from the mixer stand and stir in the finely chopped chocolate or miniature semisweet morsels. Scrape the batter into the prepared cake molds, dividing it evenly and smoothing the tops.


5. Bake the cakes for 25 to 30 minutes, until a cake tester inserted into the center of a cake comes out clean. Cool the cakes in the pan set on a wire rack for 10 minutes. 


If you also using a 7-inch cake pan like me, you can try following Miss Teochew instruction. 
Baked at 175°C for the first 30 minutes. After that, lower the temperature to 160°C for the next 40 minutes. Test with a skewer at round the 1 hour-mark. You should also tent your cake throughout the entire baking time to prevent having a burnt top. 

This is the the second time I baked this cake and the cake crack more seriously than my first attempt. I didn''t tent my cake this time round, so this is also maybe why my cake have bigger cracks though the top are not burnt

* During my first attempt, I did tent my cake, but end up the foil got sticked to the cake. Not nice. So if you want to tent your cake, you may want to ensure that your batter is not too full.

6. Invert the cakes onto the rack and cool completely.

* If you intend to chill the cake(s), make sure they are stored in a tightly-lidded container to prevent drying out.


Look at the cracks.. Its like earthquake!
 

Tuesday, 20 November 2012

Organise your measuring cups and spoons


This is quite a creative way to organise your measuring cups and spoons isn't it? Would love to do something like that for our future home.